Discover the transformative potential of Service Workers in creating robust Progressive Web Apps. Enhance user experience with modernized web technology.
Table of Contents:
- Progressive Web Apps: The Future of Web Applications
- The Role of Service Workers in Progressive Web Apps
- Harnessing the Capabilities of Service Workers
- Implementing Service Workers: A Step-by-Step Approach
- Testing Progressive Web Apps: Offline Capabilities and Interactions
- Future of Progressive Web Apps: Innovation and Expectations
Progressive Web Apps: The Future of Web Applications
Over the last couple of years, a shift has begun to create more robust web applications. These applications in many respects mirror the type of functionality that can be found in traditional smartphone apps while not requiring the parallel development required for a mobile device.
If you search the web for "progressive web apps" you’ll find plenty of resources on them. One major underlying concept uniting these progressive apps is the concept of a "Service Worker". This cutting-edge capability for browsers, some of which don’t even support it, is what will allow a rich new wave of web apps to begin changing how we interact with websites on our desktops and mobile devices.
The Role of Service Workers in Progressive Web Apps
“Okay, I get it, Service Workers are going to change how websites can work. What are they?“ Glad you asked. At its simplest, a Service Worker acts as a go-between for the client side, your web browser, and the server side, where much of the heavy lifting takes place. They exist as a single file that can oversee a portion, or all, of the pages that make up a website. With the pages appropriately registered as being within their scope, the Service Worker will intercept all communication from the client to the server and determine if what is cached in memory could be used in place of a round-trip to the server.
At this point, we’re presented with an important caveat of the Service Worker API (Application Programming Interface) in that they will only function over a secured HTTPS connection. Why is this? Well, when it comes to intercepting communication from the client to the server there is a whole host of security implications that drive this decision. So, to mitigate any vulnerabilities that may arise from leveraging a Service Worker, securing the connection via HTTPS is the only safe approach.
Harnessing the Capabilities of Service Workers
With a brief explanation out of the way, we can begin to delve into what a Service Worker may bring to the table and how they may enrich a web app by making the end user’s experience all the better.
At present, the Service Worker is very new. It is limited to only the most recent builds of only a few browsers, and while it has the ability to perform a number of different services, that list is very likely to grow in the future and enrich the web experience even further. Even now, at such an early stage, service workers may be used in a number of scenarios: pre-fetching assets to curb future load times, centralized loading of data-heavy portions of web apps in order to optimize page loads, or even leveraging server-side hooks for background services. In the future, there are plans to incorporate push notifications, background sync, and even geo-fencing.
Likely the biggest selling point of the list above is the ability to pre-fetch data and have it ready before a user needs it rather than fetching the data immediately as the user requests it. This is a paradigm shift that can change how we build rich websites in the future.
Implementing Service Workers: A Step-by-Step Approach
So, let’s look at building a Service Worker and how it could be incorporated into a web project. I want to take a different tack from what I have seen elsewhere and rather than immediately pre-fetch assets I assume a user will need, I would like to allow the user to determine which assets to pre-fetch.
To begin we’ll need a JavaScript file in the root directory of our solution. The name doesn’t matter and I called mine simply "serviceworker.js". The reason this needs to be in the root directory, as opposed to the preferred "/Scripts" directory, is that the service worker will need the full scope of the project so that it has visibility on all pages to perform the pre-fetch. I alluded to this requirement earlier and if we were interested in limiting its scope we could place it in a different directory to more tightly restrict its scope.
Now we can peek inside serviceworker.js and see what’s happening:
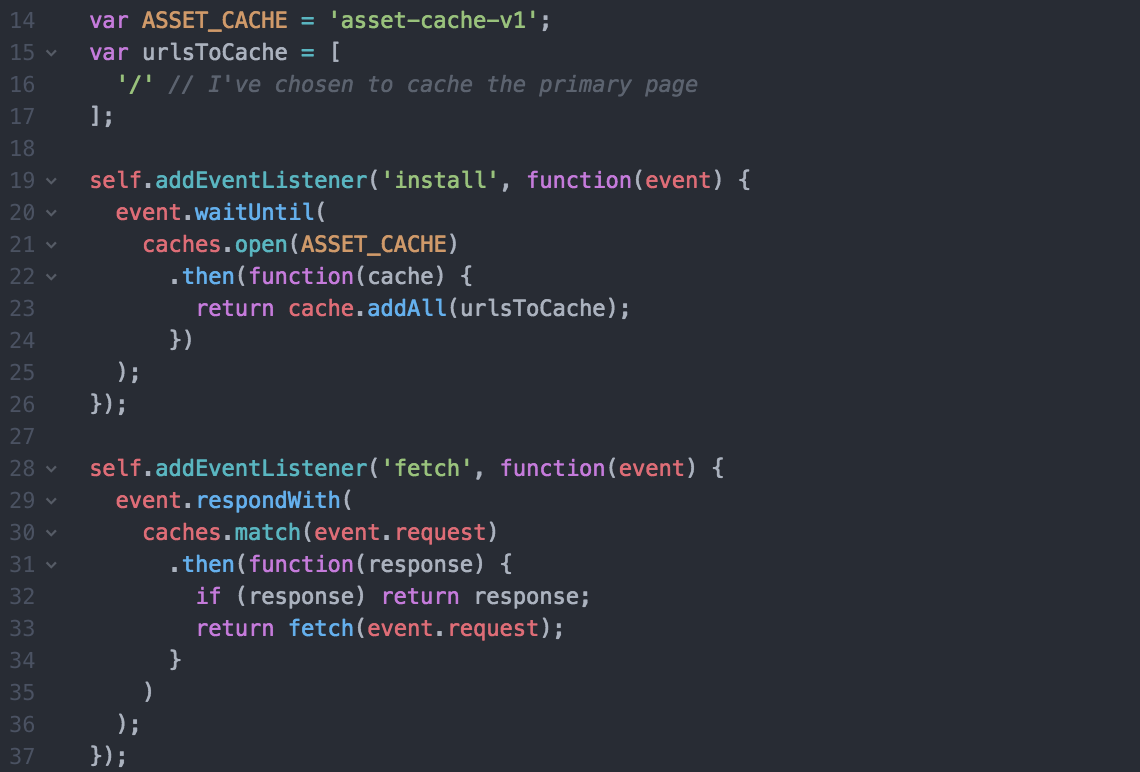
You can see from the code snippet above that we’re creating a cache as the Service Worker is installed, and immediately adding the primary page to the cache. This means that right off the bat we’ll cache the primary page, and go offline. From here we can refresh the website, and rather than receiving an offline error message, we’ll receive the cached page instead. Pretty cool, huh?
Okay, so that’s the lifeblood of the Service Worker. Now let’s see how to get it started. What we will want to do now is add a new JavaScript file. Let’s call it "startup.js", place it in the usual "/Scripts" folder, include the reference on your HTML page to ensure that it runs on page load, and include this snippet of code:
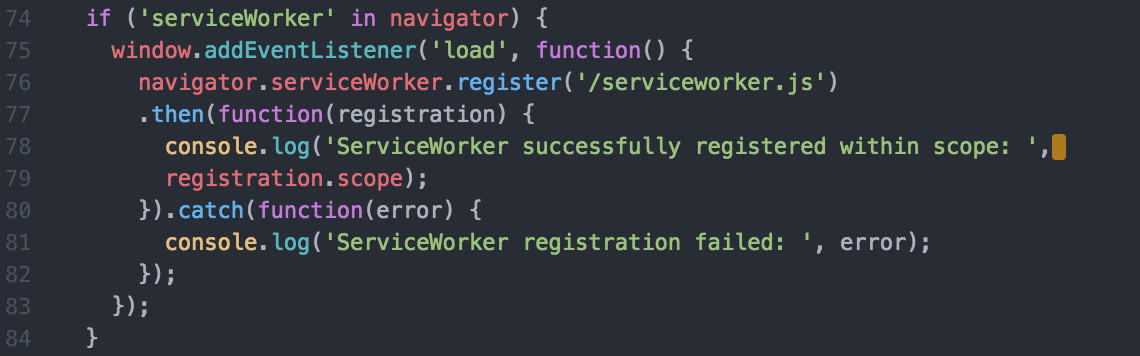
Great. We have all the pieces to turn on the service worker now. Unfortunately, this is where the caveat of browser compatibility rears its head. You can see on the very first line of the above code, “if (‘serviceWorker’ in navigator)”, is a check to verify that this API exists. If the Service Worker API is not available in the browser being tested it will simply fail to load. Otherwise, this code will attempt to load the service worker via the "install event" declared in the "serviceworker.js" file and cache any pre-defined pages.
So, now we have a Service Worker that is enabled and actively registered within the browser, what’s next? Let’s jump into some HTML and build out some basic elements that will allow us to interact with the page as well as interact with the Service Worker. As you can see below we’ll wire up a couple of anchor tags to act as links to two different pages as well as include two buttons to add one of the pages to the cache and then remove that page from the cache:
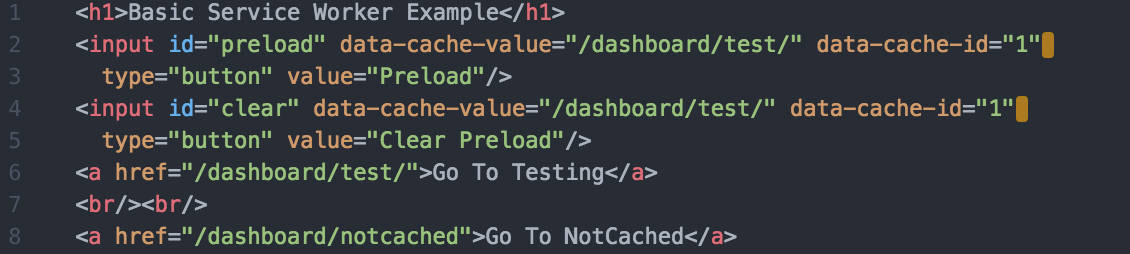
In this example, I’m using the standard MVC approach to web design. Specifically, you can see that the input tags have data attributes to store the URL structures they represent so they may easily be added to the cache. And the following anchor tags do the actual work of redirecting the user to the pages in question. Lastly, you may notice the “Go To NotCached” has no caching configured for it, and when offline you will see a standard browser offline message.
Whew, we’re almost there! Let’s revisit the "startup.js" file, where we initialize the Service Worker on page load, and we can configure the page’s buttons to add and remove a page from the cache:
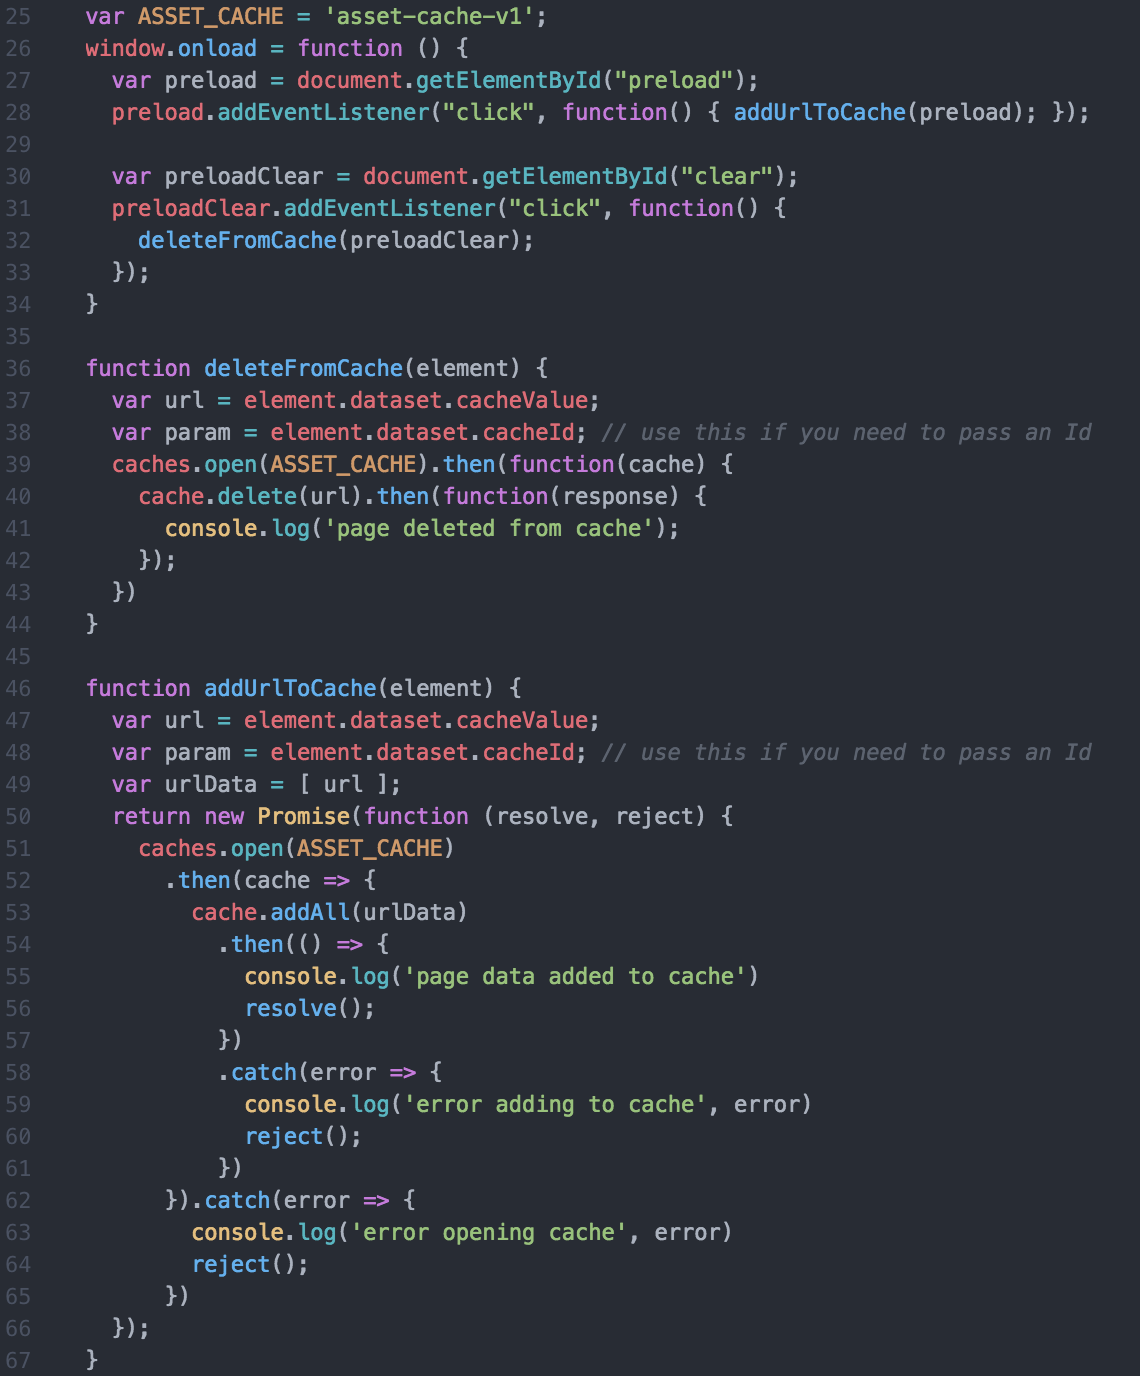
Wow, that’s a lot of code. Okay, so let’s break it down a little bit so it’s not so imposing. The first function is a basic "onLoad" function that runs when the web page has finished loading. The body of this function grabs the two HTML buttons on the page and attaches them to their respective Add and Delete functions. Next up, the "preload" button calls the “addUrlToCache” function and inserts the URL data into the service worker’s cache. Finally, the "preloadClear" button is assigned the "deleteFromCache" method which performs the opposite functionality and removes the web page in question from the cache.
Testing Progressive Web Apps: Offline Capabilities and Interactions
Alright, now we’re all set! The last thing to do is try it out. Open Chrome, to more easily follow along, fire up your web project, and load the page. From here you can open the Developer Tools to begin inspecting your Service Worker:
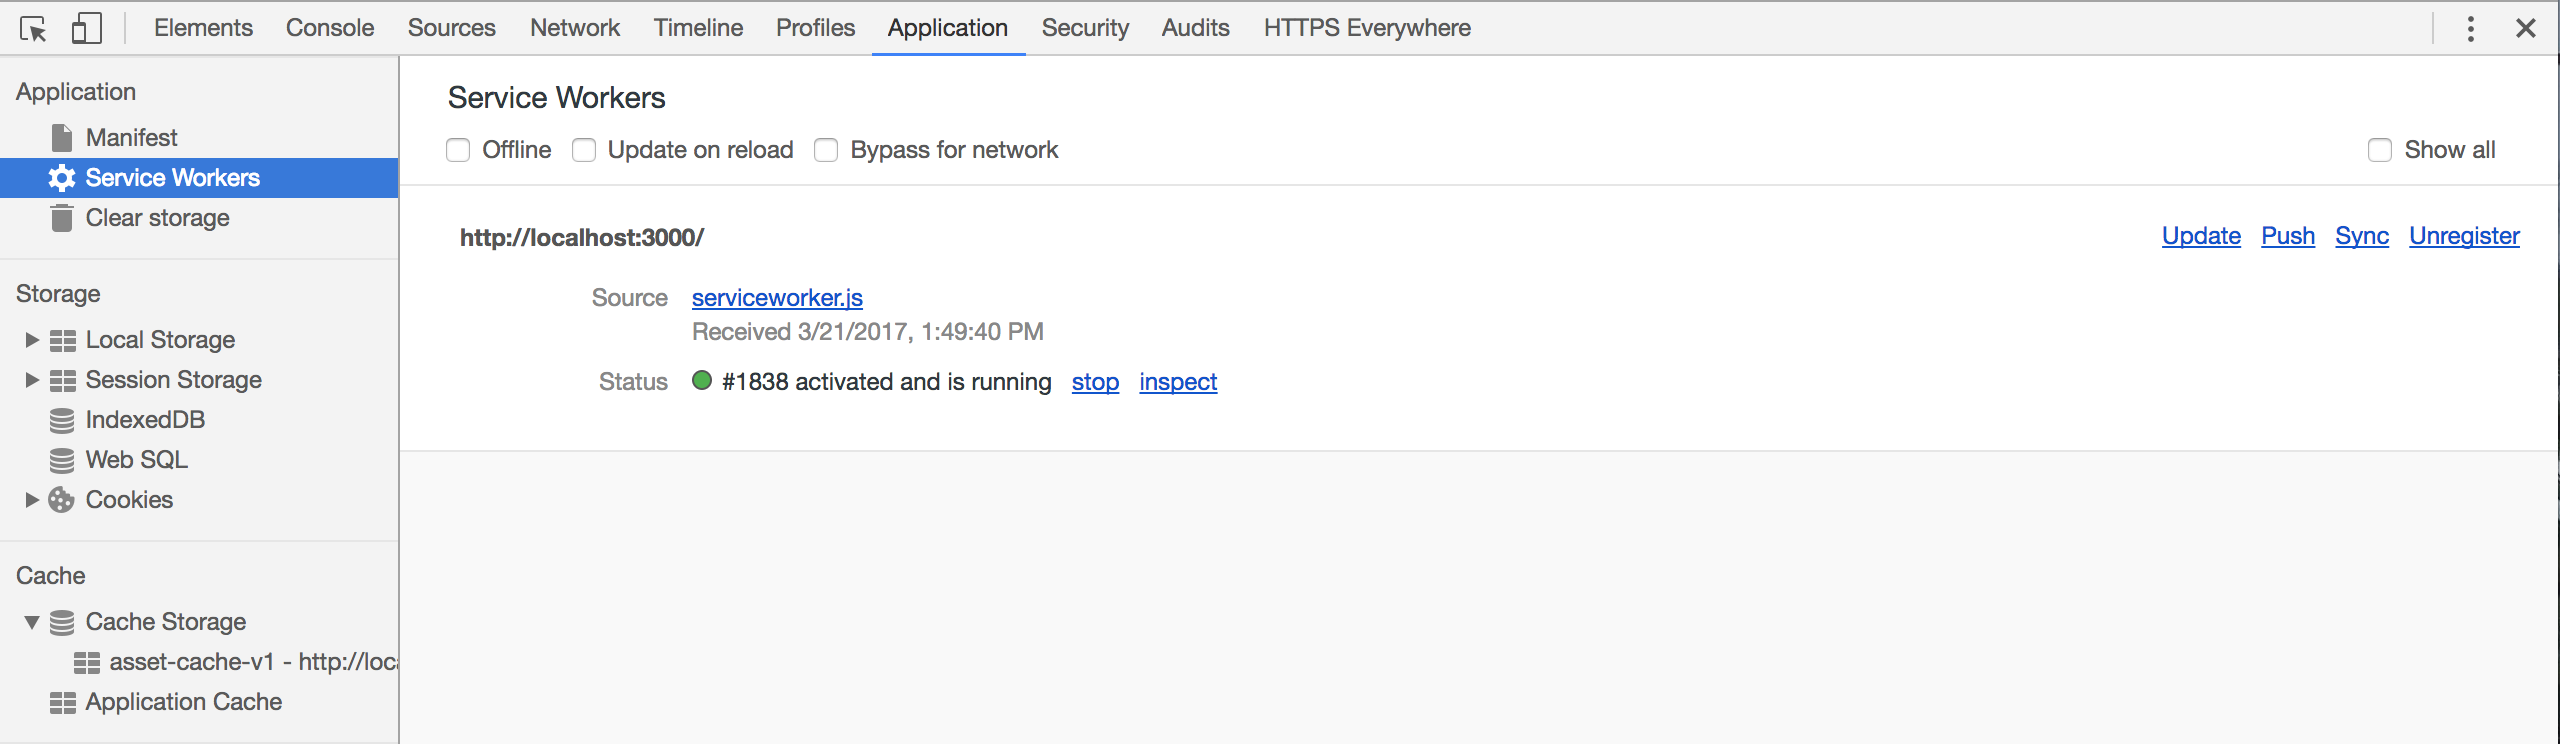
Okay, let’s take a closer look. You can see I have the "Application" tab selected and am inspecting the installed Service Workers. We can do a number of things here such as forcing the Service Worker to update, stopping it, or completely unregistering (removing) it. Also of note is the "Offline" checkbox that can help us simulate being offline.
Next up is the cache itself, let’s look at that:
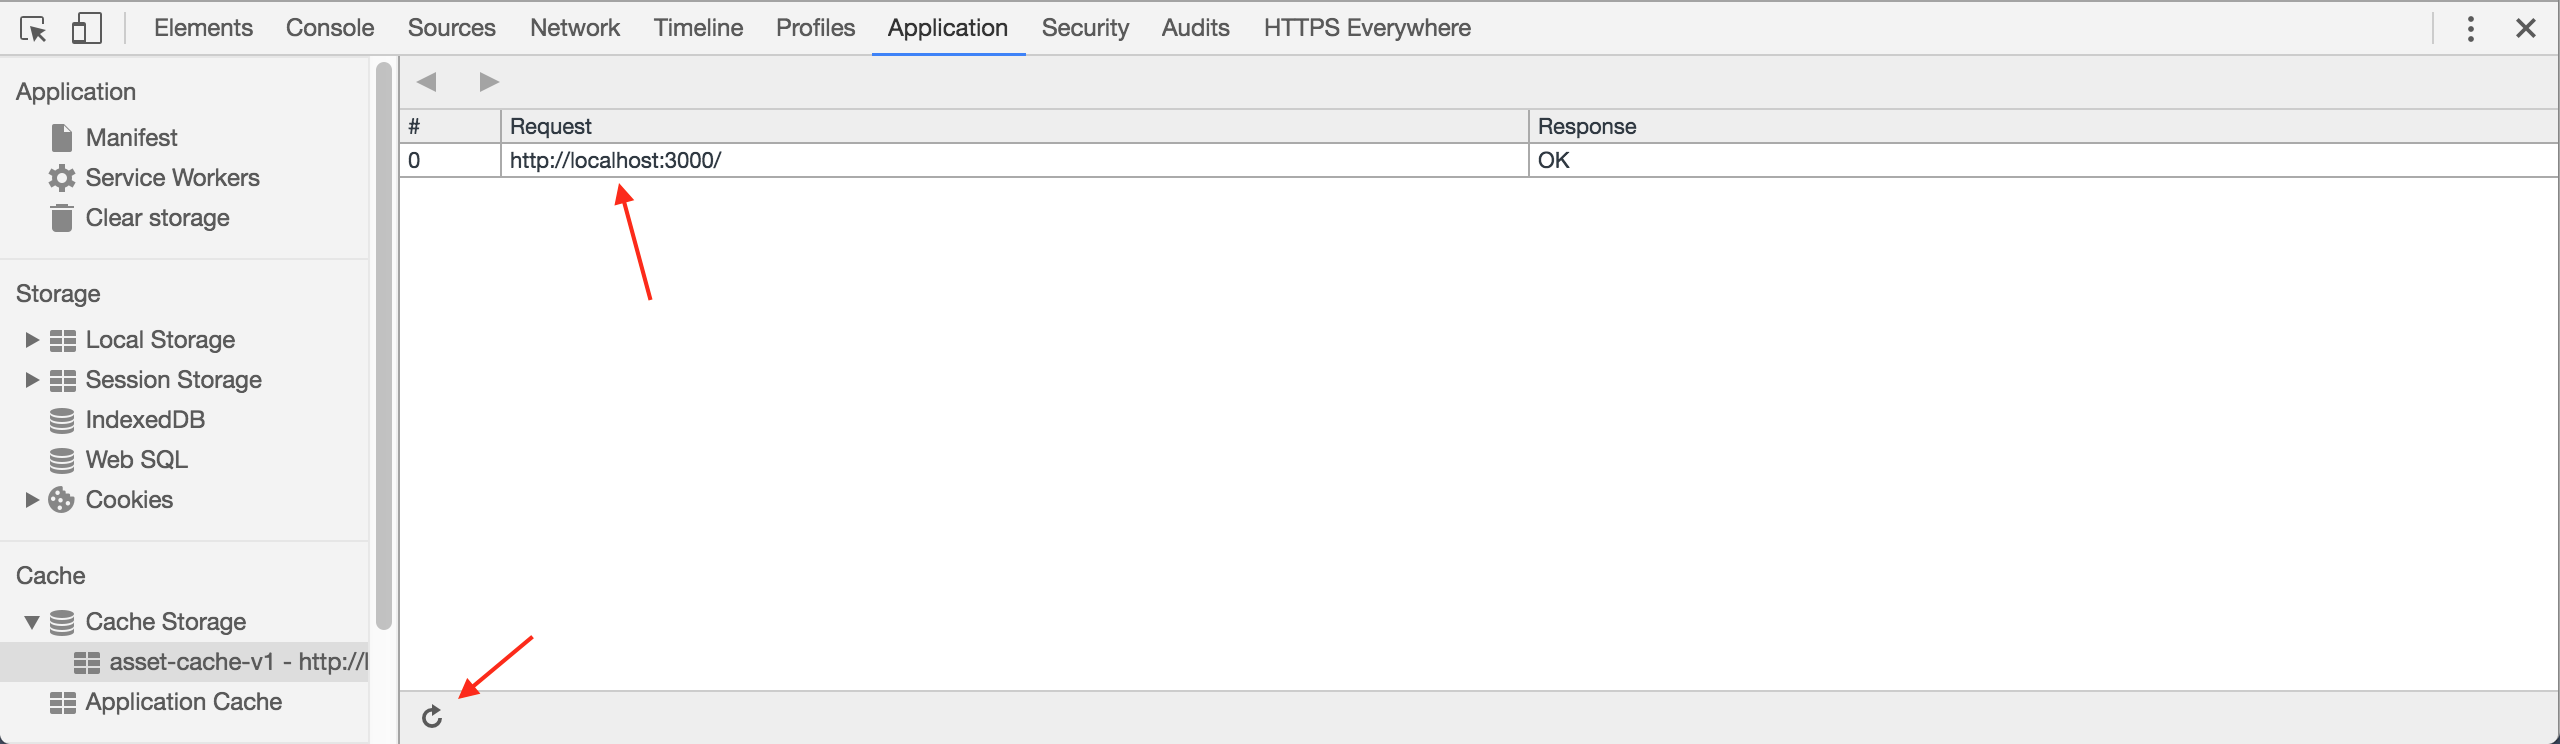
From here we can see that our browser is keeping track of one cache, the one we defined in our JavaScript, and that there is only one entry. That's the root page we defined when our Service Worker was originally installed. Now we can begin interacting with the page and adding and removing resources from the cache. So, if you click on the “Preload” button and refresh this cache window you will see the test page was added to the cache.
How can we test all of this? Easy, go back to the Service Workers tab and click the "Offline" checkbox I mentioned previously. Now we’re offline. You can now click on the "Go To Testing" link and you’ll see the page we cached. You can also go back to the index page and click the "Go To NotCached" link and you will receive your standard "No Internet Connection" error.
Future of Progressive Web Apps: Innovation and Expectations
There you have it. One of the many possibilities of progressive web apps is illustrated in a digestible, stripped-down example!
As we enter this new age of web development, Progressive Web Apps and Service Workers are paving the way for an intuitive and seamless user experience. These technologies, while still in their infancy, are set to revolutionize how we interact with websites across various devices. The promise they hold is immense: the ability to perform offline, optimize load times, push notifications, and much more. This shift toward enhanced functionality presents a thrilling opportunity for developers and businesses alike to provide users with app-like experiences right in their web browsers.
Yet, the journey has just begun. As developers continue to explore and innovate with these tools, we can anticipate a future where the line between traditional apps and web-based applications becomes increasingly blurred. As we move forward, these new paradigms of web interaction will certainly lead the charge toward a more interactive and integrated digital world. The realm of possibilities with Progressive Web Apps and Service Workers is vast, with the potential to create dynamic, responsive, and immersive web experiences that redefine the way we use the internet.